


DIY INSTALLATION GUIDE - Looking for a fitter? Click here
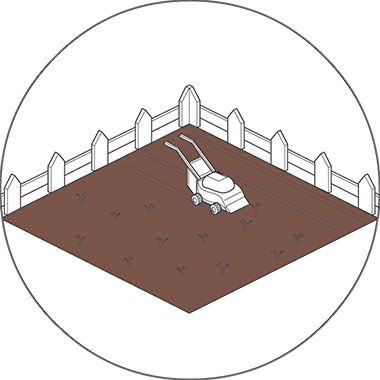
Step 1
Remove your existing lawn and use weed killer to get rid of any existing plant growth and prevent it from reoccurring - for this you can use a Turf Cutter if you have one, or alternatively a shovel will also do the trick. You will need to remove around 5-8mm to make sure no regrowth.
Edge the area you are covering with timber to create a boundary around the perimeter. Knock it into the soil with a hammer and a spare piece of timber so that it sits level with the surrounding area(s) and is secured in place.
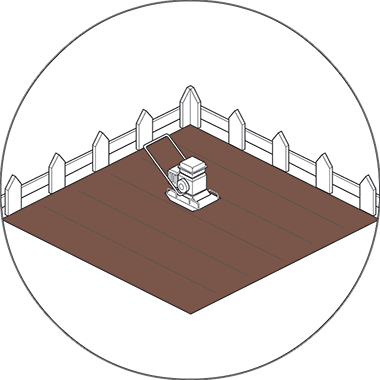
Step 2
Compact the soil until it is firm yet porous using a whacker/vibrating plate. Add a layer of hard core it is recommended around 50-75mm of MOT Type 1 or if your garden suffers poor drainage or you have pets use Limestone chipping. Then add roughly 15mm of sharp sand or dust granite to the area, compacting again and ensuring that it is back to being level with the surrounding area - you will need around 25kg of sand per m².
This creates a solid base which prevents sinkage of your new lawn, whilst also allowing it to drain away rainwater sufficiently. Once you are happy with your sub base lay over your weed membrane & attach it to your perimeter trimming away any excess.
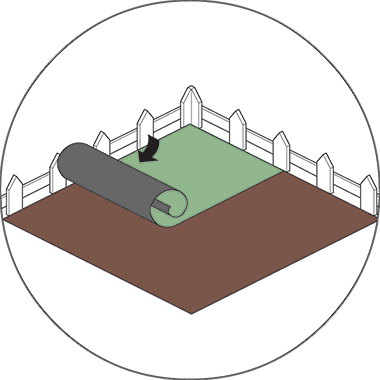
Step 3
Start the laying process by lining up your artificial grass with one of the corners of your timber perimeter and laying it flat and taut.
To achieve the most attractive result, you need to ensure the pile faces in the same direction for every roll of grass. This gives a more consistent, natural look. The best visually appealing result comes from facing the blades of grass in the direction of your vantage point. For example, for a front garden you would face the blades away from the house and towards the street. For back gardens, the pile is pointed in the direction towards the house as the vantage point is more commonly from inside the home looking outward.
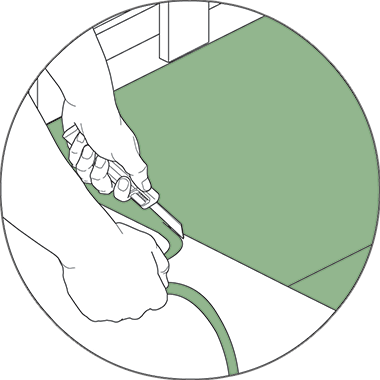
Step 4
Trim the edges off any cuts that run over the edges of your timber perimeter, so that you're left with artificial grass that perfectly covers the area you've marked out, and use galvanised fixing nails about every 15cm to secure your grass to the timber frame.

Step 5
Now that your grass is laid and fixed in place, brush over your new lawn to swap the factory fresh look for one of an authentic garden.

Step 6
Take a step back and admire your new lawn!
Let us know how you feel by leaving a review and, if you're feeling generous, upload a photo to show others what a good garden should look like.
Laying your artificial grass with a join or onto a hard surface? Refer to the information below for alternate instructions
- Loose laying
- Step 1If you are looking to put grass down as a temporary measure or just tidying up a small area loose laying is the perfect solution for you. If you are using artificial grass to cover decking or a patio you can use pot plants & heavy objects to secure in place. If you are loose laying over an existing lawn the first step would be to apply weed killer to the area. Follow the manufacturer’s instructions for the weed killing & wait until the area is completely dry.
- Step 2The next step would be to lay a weed membrane over the area to stop any growth through the grass you can lay this loose or alternatively secure with pins. Once the area is covered you can start shaping your grass using a sharp Stanley knife or if the grass is the correct size for the area lay over the top.
- Step 3Once the area is covered pull the grass taut & secure directly into the ground below using U pins. Then brush over your new lawn & admire your handiwork.
- Installing on hard surfaces
- Step 1Your Artificial Grass can easily be installed onto any existing concrete or hard and smooth surface, as long as it drains well
- Step 2Remove any debris from the area you wish to cover & lay your artificial grass onto the area
- Step 3Stretch out your Artificial Lawn to remove any ripples and fix around the perimeter using Impero Adhesive
- Step 4You can stick down the entire area if you choose to using Impero Grass Flex Adhesive - ensure your Artificial Grass is adequately secured, then flatten using a carpet roller
- Step 5Once you’re happy with the results, and ONLY in dry conditions, the final step is to dress your artificial lawn with kiln dried sand (around 8kgs per m2). Brush into the pile with a stiff brush
- Step 6Artificial Grass can also be loose laid on hard surfaces, then sand filled. If you choose this method, then the perimeter must be fixed down to prevent tripping hazards using waterproof adhesive or galvanized nails
- Performing joins on your grass
- Step 1The most important thing to ensure when joining two or more pieces of artificial grass, is that the pile runs in the same direction
- Step 2Lay the two artificial grass pieces beside each other with the pile facing up, and line the edges up together
- Step 3Fold the edge of both pieces back approximately 1 inch, then carefully trim each joining edge to remove the salvage edge
- Step 4Lay the joining cloth directly up the center of the join
- Step 5Apply Impero Adhesive along the cloth in a zig zag line, then apply an adhesive line up the side of each zig zag, onto the cloth
- Step 6Fold one side of the Artificial Grass onto half of the cloth, then fold the other side onto the cloth. Always ensure that your two Artificial Grass piece butt up together all the way up the joining seam.
- Step 7Firmly press along the length of the seam to ensure the adhesive sticks correctly and leave to dry
- Step 8Once dried completely, the final step is to dress your artificial lawn with kiln dried sand. Brush into the pile with a stiff brush.