Artificial grass has evolved into more than your regular lawn replacement. The aesthetics of the grass together with modern advances in manufacturing make it a popular choice for decking, patio, concrete and roof coverings too. This helpful guide will assist you through the process of fitting artificial grass to concrete, patio, and hard surfaces.
Fitting artificial grass to the concrete or other hard surfaces can be easily achieved by using the following steps as a guide:
- Ensure the surface area is clean and free from debris and dust (if using an artificial grass glue ensure the surface is dry)
- Choose the direction you would like the pile to face
- Carefully cut the piece to size using a sharp knife
- Roll your artificial grass across the anticipated area leaving 50 mm overlap at each side of the area and leaving the grass to settle for a couple of hours
- Turn your grass upside down (if gluing), apply your chosen adhesive to the underside of your grass and flip the grass back over
- If stapling or nailing (decking) apply your staples/galvanized nails at intervals of up to 50 cm
Is your Subfloor Suitable for Artificial Grass?
Before fitting artificial grass to hard surfaces, ensure the area you are covering is clean and free from any debris and dust. You also need to make sure there is good drainage in the area. For concrete, tarmac or patio surfaces, you may need to apply a self-leveling compound to remove surface imperfections.
When laying artificial grass over hard surfaces, you can either glue it around the edges underneath the artificial grass. Glue the whole of the underneath of the artificial grass**. Staple/nail the grass to the subfloor (this option is only applicable for surfaces like decking). Or use a combination of bonding options. If using adhesive, to allow the adhesive to bond successfully to the sub-floor, the surface must be completely dry.
**if you are fully gluing the underneath of your artificial grass, rollover with a weighted roller every fifteen minutes for an hour to help the adhesive bond. Allow the adhesive to dry for the glues specified time before walking over your new artificial grass.

How to Fit Artificial Grass to Hard Surfaces
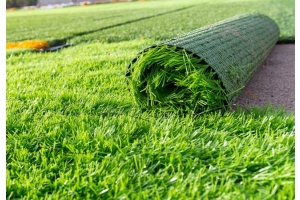
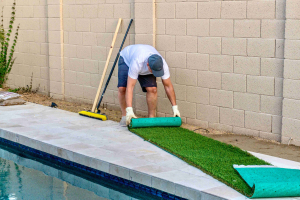
Carefully roll your artificial grass out across the anticipated area. Stretch it out, ensuring it covers the full area as well as leaving a 50mm overlap at each side of the area. Leave the grass for a couple of hours to allow it to settle.
- Choose the direction you would like the pile to face. We recommend that you lay your artificial grass with the pile facing towards the house if fitting in the back garden. This will provide the best and most natural look from the window. If you are laying it in the front garden, you may consider laying your artificial grass away from the house. This would look best to approaching visitors. Once you have decided the direction, lay your pieces of artificial grass in position.
- Carefully cut the piece to size using a sharp Stanley knife. It is easier to cut the grass from underneath the grass.
If you are gluing your artificial grass down:
- Turn your grass upside down and apply your chosen artificial grass adhesive either around the circumference or completely covering the underside of the artificial grass. Remember to follow your chosen glue’s instructions.
- Then turn the grass back over and position your artificial grass in place, pressing it down in the areas where adhesive is applied **
- Brush the pile up with your hands to finish off, as it may have been flattened during transportation.
If you are stapling/nailing your artificial down (this is only suitable for decking):
- Apply your staples/galvanized nails at regular intervals of up to 50 cm.
- Brush the pile up with your hands to finish off, as it may have been flattened during transportation.
Please note: Some grasses may require a sand infill once it has been laid. This will help hold the grass in position and to keep it upright. The amount needed varies depending on the grass. If you are using sand, we recommend using a little at a time until you are happy with the effect. This should be done on a dry day and should be brushed in against the pile.
We hope this guide has helped you. If you require any further assistance, then please do not hesitate to contact a member of our team now.


